Category Archives: Microsoft Windows

Clean install of Windows 11 (on VMWare) without TPM 2.0 Fix for his PC does not support windows 11


Step 1. Proceed with normal steps to install windows 11, and we will encounter a prompt interface that this PC does not support Win11.


Step 2. on keyboard press and hold “Shift+F10”


Step 3. At commond prompt type the following

REG ADD HKLM\SYSTEM\Setup\LabConfig /v BypassTPMCheck /t REG_DWORD /d 1


Step 4. Exit command prompt window and installation error window


Step 5. Wait for installation to restart, you should be able to proceed without any issues.


If the error repeat steps 2 to 4

Manually Clean Mailbox Exchange 2007/2010

Recently I had to convert a linked mailbox to a regular mailbox . I disabled the mailbox and to my horror I could not find the mailbox under disconnected mailboxes. First I decided to remain calm (that means PRAY the mailbox was not gone for ever)
I then turned to ‘Dr Google’ and after trial and error I found the key to sanity  . Below I now list the technical steps and relevant links. The following works with exchange 2007 /2010

According to technet I need to do a mailbox cleanup (this process is done on a schedule automatically after normal working hours)

Use the Clean-MailboxDatabase cmdlet to scan Active Directory for disconnected mailboxes that aren’t yet marked as disconnected in the Microsoft Exchange store and update the status of those mailboxes in the Exchange store. This cmdlet isn’t able to update the Exchange store unless the Microsoft Exchange Information Store service is running and the database is mounted.
syntax
clean-MailboxDatabase -Identity <DatabaseIdParameter> [-Confirm [<SwitchParameter>]] [-DomainController <Fqdn>] [-WhatIf [<SwitchParameter>]]

https://technet.microsoft.com/en-us/library/bb124076.aspx

This command syntax was a bit confusing so for clarity , below is the command I ended up typing (twice after my first refresh didn’t show anything)

Clean-MailboxDatabase -Identity mailboxservername/Databasename

The cursor is returned within a few seconds and I could now view the disconnected mailbox and proceeded with connecting the mailbox to a newly created windows account.

How to enter Rescue Mode /SAFE MODE on a sony Vaio E Series – SVE111B11L Netbook to recover lost files


Side notes..

This netbook comes with windows 8  but steps apply to windows 7 as well.

Windows 8 new method for entering safe mode has changed, we now how to press Shift + F8

The big surprise though is this doesn’t always work. Instead you will be greeted by the automatic repair feature ‘Preparing to auto repair message’ which can take anywhere from  to 15 days to complete.

The Sony VAIO E series has an assist button, simply power off computer and then press and hold the assist button until the VAIO  logo appears. Release and then wait.

You will then be presented with VAIOCARE | Rescue ModeVAIOCARE RESCUE


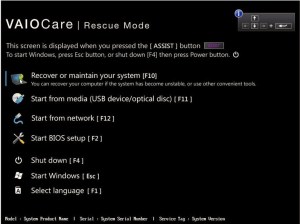
There are a few options , in this case we will be pressing F10

Select keyboard layout in the next screen

Under choose an option click troubleshoot

under troubleshoot choose advanced options

Under advanced options choose command prompt

you will then be presented with the command prompt from there you can access you local disks

all being well, no passwords required and you will have full access to your data

to access C drive type ‘c:’ press enter

type dir to confirm contents

at this point you can attach a usb or external drive you will have to guess which drive is your usb device.

to copy files from your user folder here are a 2 examples

Example 1 – Files are in ‘Users\Johnny\documents’  and assuming usb drive is on f:

we would type ‘xcopy c:\users\johnny\documents f:\backup  /f/s ‘  you will be prompted to confirm directory or file press D on keyboard

This would copy the content of the documents folder to a newly created  folder on your usb called ‘backup’

Example 2 – Files in ‘ Users\John Gates\music’ and assuming usb drive is on f:\

we would type ‘xcopy c:\users\”john gates”\documents f:\backup  /f/s ‘  you will be prompted to confirm directory or file press D on keyboard

notice the ” we use this when folders and files have a space in the name.

This would copy the content of the documents folder to a newly created  folder on your usb called ‘backup’

Further reading : Dos commands : Xcopy commands.

Tool to use to recover files from windows based harddrives

Active Partition Recovery Professional v7.1

Active@ Partition Recovery for Windows will help you if non-system partition is lost, i.e. you can boot Windows, install and run the software from under Windows Operating System to recover deleted or damaged partitions located on data volumes (D:, E: …), attached HDDs, as well as on the external USB drives and Memory Cards (SunDisk, MemoryStick, CompactFlash, etc…). BOOT.INI is corrected automatically (if needed) to keep the system bootable, as well as damaged Volume Boot Sectors are corrected to mantain integrity of the partition. Software allows also to fix damaged MBR and to delete invalid partitions.

Features:

  • Supports exFAT, HFS+, Ext2/Ext3/Ext4
  • Completely redesigned GUI
  • Includes freeware DOS tools & Disk Editor
  • improved SuperScan algorithms
  • Large disks are supported (larger than 2TB)
  • Improved Extended Scan algorithms
  • Full installation package now includes Bootable Disk Image, Bootable Disk Creator (Enterprise ver.)
  • Windows PE 3.1 (Based on Windows 7 SP1) – Enterprise ver.
  • Undelete partitions (Primary and Extended)
  • Create and restore Raw Disk Image back to HDD
  • Keep this program on a bootable floppy disk due to its small size
  • Display complete Physical and Logical Drive information
  • Restore MBR, Partition Table and Boot Sectors from backup if damaged

Visit them http://www.partition-recovery.com/